Configuring Knowledge Bases
Uploading files, connecting LMS content & using internal repositories
Written By Asad Jobanputra
Last updated 6 months ago
Adding Manual Files
Navigate to Explore Agents → Edit for your agent.
Select Knowledge Base in the Setup Progress.
Click Files.
Choose Upload File.
Drag files into the window or click Browse Files. Acceptable formats and limits are displayed in the modal (e.g., up to 10 files at a time, 20 MB each).
After selecting your files, press Save. The files will appear in the uploaded list with status and sync date.
You can download or delete files later from this list.
Important: Do not upload sensitive or confidential data unless you have permission. Uploaded content becomes part of the agent’s knowledge.
Connecting Content from Cloud Drives
To connect repositories where your LMS stores course material, use the integration tabs in Knowledge Base:
Within Knowledge Base, select the appropriate drive: OneDrive, Google Drive, Box Drive.
Click Connect (you may need to authenticate via SSO or grant access permissions).
Browse to the folder or files you want the agent to use.
Confirm your selection. The files or folders are indexed and show a sync status in the list.
Repeat for other repositories as needed.
Note: You may have to contact your IT administrator to enable these integrations if they aren’t already configured.
Using Web Page Content
You can instruct the agent to crawl internal web pages (e.g., policy sites or knowledge portals) and build its knowledge base from them.
In Knowledge Base, choose Web Pages.
Click Create Web Crawler.
Enter:
Base URL – the starting page of your internal repository or website.
Strategy – how the crawler navigates (e.g., breadth‑first for broad coverage).
Method – the crawling technique (automatic or manual).
Depth – how many levels of links to follow.
Save your crawler. It will appear in the table with columns for base URL, strategy, method and depth.
The agent begins indexing the site. You can edit or delete the crawler via the Actions column.
Warning: Only crawl pages your institution owns or is authorized to access. Avoid crawling personal data or student information without consent.
Knowledgebase Analytics
Web Pages
The Web Page Crawler Reporting module is a centralized reporting dashboard that lists the root URLs (for example, https://www.bikewale.com/royalenfield-bikes/) used to crawl web content, against a configurable maximum limit of 100 URLs. Crawling is performed using Crawl4AI strategies such as depth-first and breadth-first traversal.
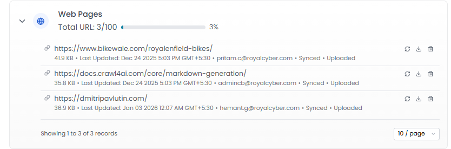
For each URL, the dashboard displays:
Processed content size (KB/MB) ingested into Azure AI Search for knowledge indexing
Crawler completion timestamp (Last Updated)
Synchronization status (for example: Pending, In-Progress, Completed, Failed)
Uploader/initiator identity (for example: admincb@royalcyber.com)Best Practices & Notes
Organize files: Name files clearly (e.g.,
Admissions_Policy_2025.pdf) so you can find and update them later.Use the right source: For LMS content stored in cloud drives, use the corresponding drive integration rather than uploading duplicates.
Refresh regularly: If policies or course materials change, replace outdated files or re-sync connected folders.
Limit crawler depth: For internal websites, set a reasonable crawl depth to avoid indexing irrelevant pages.
Highlight risks: Tag documents containing sensitive data with appropriate permissions and avoid broad sharing.
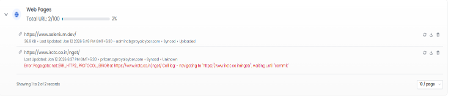
Error Reporting
The dashboard also reports crawl failures when a crawling operation fails. Error details are captured and displayed against the corresponding URL to help users diagnose issues such as unreachable pages, timeouts, parsing failures, or strategy-related errors.
Error logging is illustrated in the screenshot below.
Action Controls
For each listed URL, the interface provides three action controls:
Resync – Re-crawl the URL on demand
Download – Download the processed crawl output for offline review
Delete – Permanently remove the URL and all associated data from all integrated systems
Upon a successful resync, the system automatically refreshes the processed content, content size, and timestamps.
Additionally, the dashboard provides a dynamic, paginated listing of crawled URLs to support efficient navigation and management.
Files
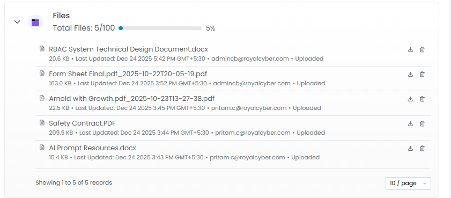
The Custom Agent Files Reporting module provides a centralized dashboard for managing files uploaded to custom agents. It tracks the total number of uploaded files against a configurable maximum limit of 100 files.
For each file, the dashboard displays:
File name
File size (KB/MB)
Last updated timestamp
Sync status
Uploader identity
Action Controls
For each listed file, the interface provides two action controls:
Download – Download the uploaded file for offline access or review
Delete – Permanently remove the file and all associated references from the system
Additionally, the dashboard offers a dynamic, paginated listing of uploaded files to enable efficient navigation and file management.
Troubleshooting
File won’t upload: Check file type and size. Only supported formats under 20 MB will upload.
Integration fails: Ensure you have correct permissions. You may need to sign in again or re‑authorize the app.
Web crawler shows no pages: Verify the base URL is reachable and accessible from the CampusMind platform. Some sites block bots; consult IT if needed.
Agent not using new content: It may take a few minutes for newly added sources to index. Wait and retest.