Publishing AI Agent using Chat Widget
Chat Widget Integration Guide
Written By vendor@royalcyber.com
Last updated 6 months ago
What is the Chat Widget?
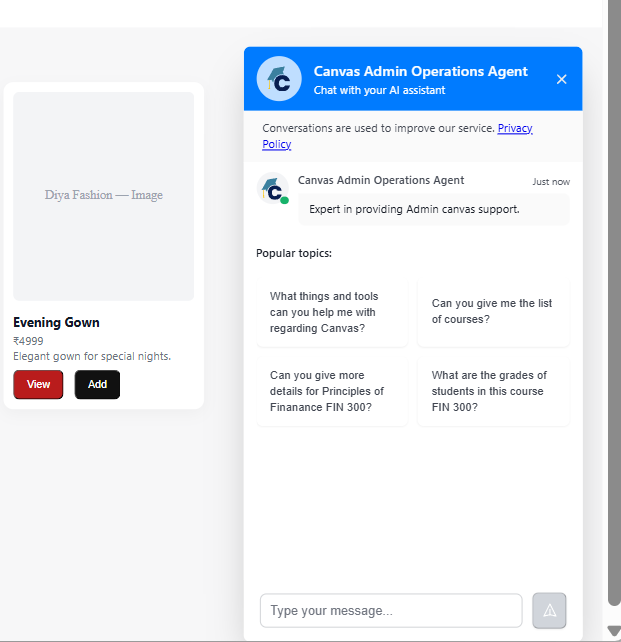
The Chat Widget is an embeddable chat interface that allows you to integrate CampusMindAI agents directly into your website. Visitors can interact with your AI agent without leaving your site, providing seamless support and assistance.
Why Use the Chat Widget?
Website Integration: Add AI assistance directly to your website
Seamless Experience: Users interact without leaving your site
Customizable: Match your brand colors and positioning
File Support: Enable document uploads for context-aware responses
Easy Deployment: Simple copy-paste integration with no backend required
Prerequisites
Before integrating the chat widget:
Agent created in CampusMindAI
Edit permissions for the agent
Access to your website's HTML code
Setup Steps
Step 1: Navigate to Agent Settings
Go to your agent's edit screen
Click on the Publishing tab
Locate the Chat Widget section
Step 2: Enable Chat Widget
Toggle the Chat Widget switch to ON
Click Generate API Key
Copy the generated API key (save it securely)
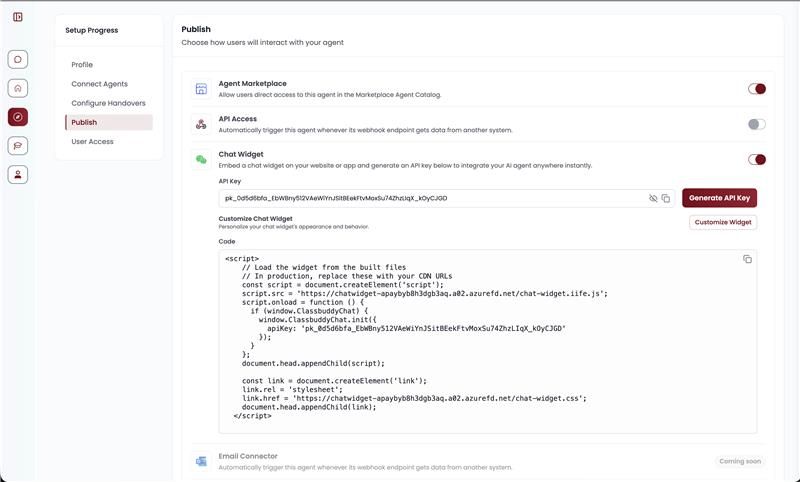
Step 3: Copy Integration Code
The following HTML code will be displayed:
<script>
    // Load the widget from the built files
    const script = document.createElement('script');
    script.src = 'https://cdn.campusmind.ai/chat-widget.iife.js';
    script.onload = function () {
      if (window.ClassbuddyChat) {
        window.ClassbuddyChat.init({
          apiKey: 'your-api-key'
        });
      }
    };
    document.head.appendChild(script);

    const link = document.createElement('link');
    link.rel = 'stylesheet';
    link.href = 'https://cdn.campusmind.ai/chat-widget.css';
    document.head.appendChild(link);
</script>
Step 5: Add to Your Website
Open your website's HTML file
Paste the code before the closing
</body>tagSave and deploy your website
Step 6: Verify Integration
Load your website in a browser
Look for the chat widget icon (bottom-right or bottom-left corner)
Click to open and test the chat functionality
Chat Widget Personalization
Customization Guide
Primary Color
The primary color affects:
Widget header background
Send button color
User message bubbles
Interactive elements
Format: Hexadecimal color code (e.g., #007bff, #FF5733)
Tips:
Use your brand's primary color
Ensure sufficient contrast for text readability
Test on both light and dark backgrounds
Widget Icon
Customize the chat button icon:
Requirements:
SVG format recommended for scalability
Hosted on accessible URL (HTTPS)
Square aspect ratio (e.g., 24x24px, 48x48px)
Light color for dark backgrounds, or use transparent background
Example:
widgetIcon: 'https://cdn.example.com/icons/chat.svg'
Placeholder Text
Set welcoming text shown before user starts chatting:
Best practices:
Keep it concise (under 50 characters)
Match your agent's purpose
Use friendly, inviting language
Examples:
"Ask me about our courses""Need help? I'm here to assist""Chat with our AI assistant"
File Upload Feature
Enabling File Upload
Set
enableFileUpload: truein configurationRequest admin approval (if not already enabled)
Users will see attachment button in chat interface
Supported File Types
Documents: PDF, DOC, DOCX
Text files: TXT, CSV
Maximum file size: 10MB
User Experience
When enabled:
Attachment icon appears in chat input
Users click to select files
Files are uploaded and processed by agent
Agent references file content in responses
Testing Checklist
Before launching to production:
[ ] Widget appears in correct position
[ ] Primary color matches brand
[ ] Chat opens and closes smoothly
[ ] Messages send and receive correctly
[ ] Agent responds appropriately
[ ] File upload works (if enabled)
[ ] Custom icon displays correctly
[ ] Widget works on mobile devices
[ ] Widget works across different browsers
[ ] No console errors
Support
Need help with widget integration?
Documentation: Visit CampusMind Knowledge Base
Live Chat: Click chat icon in CampusMind dashboard
Email: support@campusmind.ai
Technical Issues: Include browser console errors in support request